环境
网络配置:
| public_network | cluster_network | |
|---|---|---|
| 控制节点/ceph-mon | 192.168.4.6 | 192.168.3.5 |
| ceph-osd1 | 192.168.4.12 | 192.168.3.9 |
| ceph-osd2 | 192.168.4.8 | 192.168.3.7 |
硬件配置:
ceph-mon
cpu:4核
内存:4G
ceph-osd1
cpu:4核
内存:4G
硬盘:3块100G磁盘
ceph-osd2
cpu:4核
内存:4G
硬盘:3块100G磁盘
将selinux和firewalld关闭,或配置防火墙规则
配置软件源:
163 yum源wget -O /etc/yum.repo/ CentOS7-Base-163.repo http://mirrors.163.com/.help/CentOS7-Base-163.repo
配置epel源wget -O /etc/yum.repos.d/epel.repo http://mirrors.aliyun.com/repo/epel-7.repo
增加ceph源
vim /etc/yum.repos.d/ceph.repo
1 | [ceph] |
清理yum缓存
yum clean all
创建缓存
yum makecache
所有节点安装ceph
yum install ceph –y
开始部署
在部署节点安装我这里的是openstack的controller节点安装ceph-deploy,手动部署参考上一篇文章 http://www.bladewan.com/2017/01/01/manual_ceph/#more
yum install ceph-deploy –y

在部署节点创建部署目录
mkdir /etc/ceph
cd /etc/ceph/
ceph-deploy new control-node1
没有erro继续向下
此时目录下有
ceph.conf、ceph-deploy-ceph.log、ceph.mon.keyring
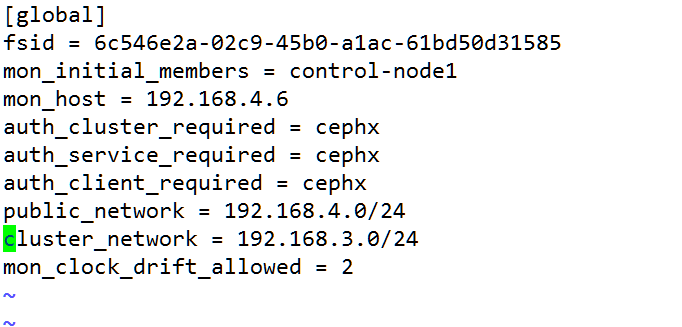
修改ceph.conf添加public_network和cluster_network,同时增加允许时钟偏移
vim /etc/ceph/ceph.conf
开始monitor
在controller上执行
ceph-deploy mon create-initial
……
部署目录多了以下文件
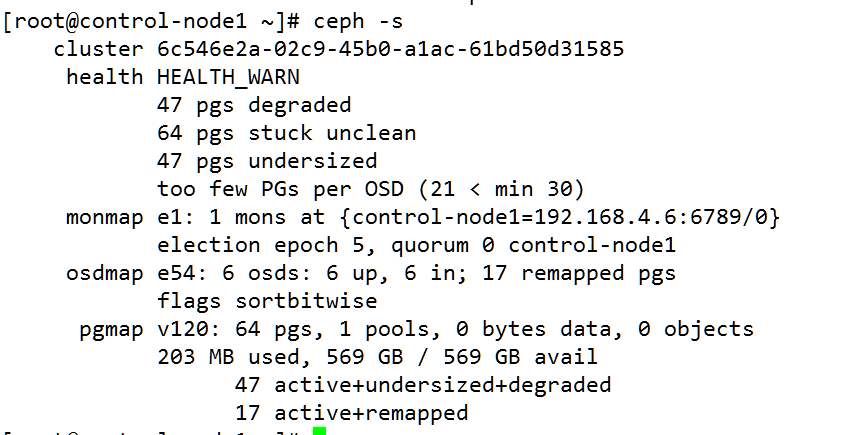
查看ceph状态
ceph -s
此时ceph状态应该是ERROR的
health HEALTH_ERR
no osds
Monitor clock skew detected
部署osd
ceph-deploy --overwrite-conf osd prepare ceph-osd1:/dev/vdb /dev/vdc /dev/vdd ceph-osd2:/dev/vdb /dev/vdbc /dev/vdd --zap-disk
部署完后查看ceph状态

查看osd tree

推送配置ceph-deploy --overwrite-conf config push ceph-osd1 ceph-osd2
重启ceph进程
mon节点
systemctl restart ceph-mon@control-node1.service
osd节点重启
systemctl restart ceph-osd@x
查看public_network和cluster_network配置是否生效
根openstack对接
Ceph
创建pool
根据公式计算出每个pool的合适pg数
PG Number
PG和PGP数量一定要根据OSD的数量进行调整,计算公式如下,但是最后算出的结果一定要接近或者等于一个2的指数。Total PGs = (Total_number_of_OSD * 100) / max_replication_count
例:
有6个osd,2副本,3个pool
Total PGs =6*100/2=300
每个pool 的PG=300/3=100,那么创建pool的时候就指定pg为128
ceph osd pool create pool_name 128
ceph osd pool create pool_name 128
创建3个pool
ceph osd pool create volumes 128
ceph osd pool create images 128
ceph osd pool create vms 128
创建nova、cinder、glance、backup用户并授权
1 | ceph auth get-or-create client.cinder mon 'allow r' osd 'allow class-read object_prefix rbd_children, allow rwx pool=volumes, allow rwx pool=vms, allow rwx pool=images' |
生成keyring文件
控制节点
ceph auth get-or-create client.cinder | tee /etc/ceph/ceph.client.cinder.keyring
ceph auth get-or-create client.glance | tee /etc/ceph/ceph.client.glance.keyring
修改文件属组
chown cinder:cinder /etc/ceph/ceph.client.cinder.keyring
chown glance:glance /etc/ceph/ceph.client.glance.keyring
计算节点
ceph auth get-or-create client.cinder |tee /etc/ceph/ceph.client.cinder.keyring
ceph auth get-or-create client.nova |tee /etc/ceph/ceph.client.nova.keyring
ceph auth get-or-create client.glance |tee /etc/ceph/ceph.client.glance.keyring
修改文件属组
chown cinder:cinder /etc/ceph/ceph.client.cinder.keyring
chown nova:nova /etc/ceph/ceph.client.nova.keyring
在计算节点上生成uuidgen(所有计算节点用一个就可以)
uuidgen
f77169a0-7d56-4fc3-a436-35298081f9f9
创建secret.xml
vim secret.xml
1 | <secret ephemeral='no' private='no'> |
导出nova的keyring
ceph auth get-key client.nova | tee client.nova.key
virsh secret-define –file secret.xml
virsh secret-set-value –secret f77169a0-7d56-4fc3-a436-35298081f9f9 –base64 $(cat client.nova.key )
查看secret-value
另外一台计算节点一样
修改openstack组件配置
glance
cp /etc/glance/glance-api.conf /etc/glance/glance-api.conf.bak
vim /etc/glance/glance-api.conf
1 | [DEFAULT] |
重启glance-api和glance-registry
systemctl restart openstack-glance-api
systemctl restart openstack-glance-registry
cinder
cp /etc/cinder/cinder.conf /etc/cinder/cinder.conf.bak
vim /etc/cinder/cinder.conf
1 | enabled_backends = rbd |
重启cinder-api、cinder-schedule、cinder-volume
systemctl restart openstack-cinder-api
systemctl restart openstack-cinder-volume
systemctl restart openstack-cinder-scheduler
nova
修改nova-compute
cp /etc/nova/nova.conf /etc/nova/nova.conf.bak
修改nova.conf
添加如下配置
1 | [libvirt] |
重启nova-compute
systemctl restart openstack-nova-compute
测试
glance
上传镜像,在ceph pool中查看是否存在openstack image create "cirros" --file cirros-0.3.4-x86_64-disk.img --disk-format qcow2 --container-format bare –public
存在说明对接正常
cinder
在控制台创建个云硬盘,创建成功后在ceph的volumes pool池中可以看见刚刚创建的云硬盘说明创建成功
nova
在控制台创建个云主记,创建成功后在ceph的vm pool池中可以看见刚刚创建的云主机说明创建成功
