前言
通过crushmap划分性能型池和容量型池。
在实际生产环境中,考虑到成本因素,很少土豪公司会将osd全部用ssd,但私有云上有部分业务需要高性能存储,部分业务只需要普通的sas盘做容量性存储,在公有云中也经常有,不同性能的存储卖不同的价格。
在ceph中的解决方法就是通过修改crushmap,创建多种host,将osd加入到host中,在创建多个pool,每个pool对应不同的rule
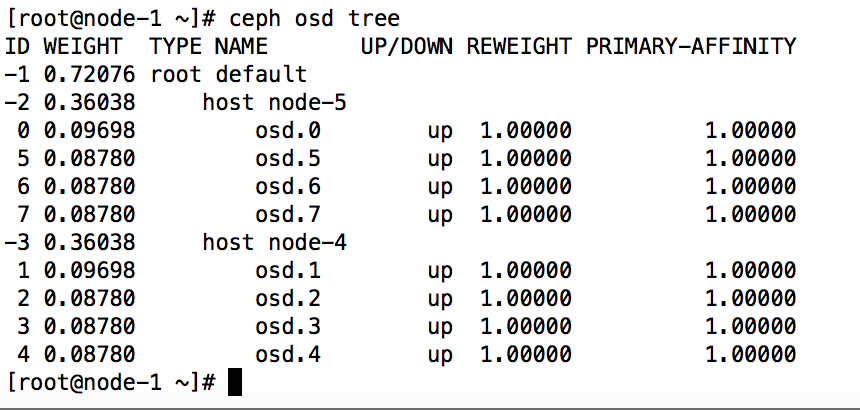
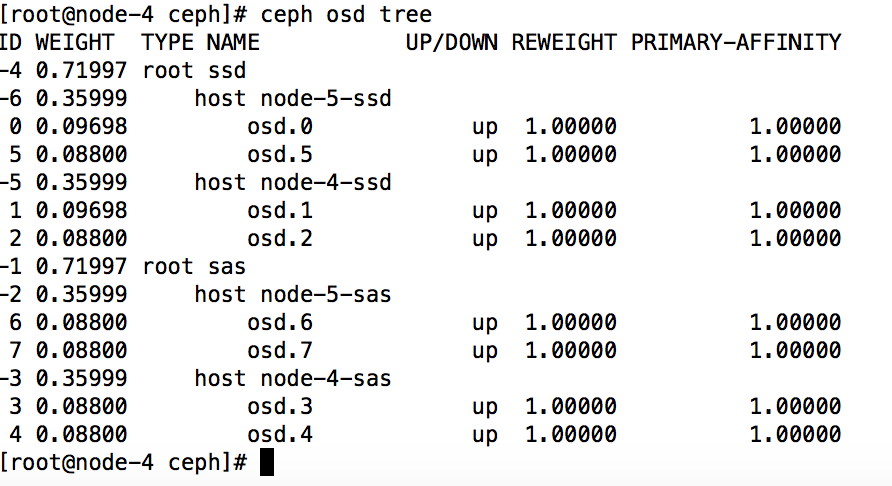
本例中两个存储节点的前两个osd为ssd,后面两个osd为sas。需要划分ssd pool和sas pool,其中云主机和性能型存储用sas pool, 性能型存储为ssd pool。
环境
两台存储节点node-4、node-5,每个存储节点4个osd,将每个存储节点的前两个osd是ssd盘,后两个osd是sas盘
层级结构:
中host bucket高于osd bucket,root bucket高于host bucket,划分步骤为:
1、创建对应的host bucket 如node-4-sas、node-4-ssd、node-5-sas、node-5-ssd。
2、将对应的osd划到对应的host中。
3、创建root,如ssd、sas,将对应的host加到对应的root中。
4、创建rules将root加入到对应的rule中。
5、pool调用ruleset。
权重:修改crushmap时需要特别注意osd的权重问题,1TB OSD为1.00,500G为0.50,3TB位3.00
rules:pool所使用的规则,在crushmap中有一个对应的id,pool直接使用这个id表示这个pool的pg按这个规则进行分布。
修改方法有两个
先修改ceph.conf禁止osd启动时自动修改crushmap
echo ‘osd_crush_update_on_start = false’ >> ceph.conf
第一直接直接使用ceph命令创建bucket,move bucket,在修改rules。
第二通过将crushmap导出,修改crushmap的方式。
方法1(直接通过ceph命令):
1
2
3
4
5
6
7
8
9
10
11
12
13
14
15
16
17
18
19
20
21
22
23
|
1、创建对应的root
     ceph osd crush add-bucket ssd root
     ceph osd crush add-bucket sas root
2、创建对应的host
      ceph osd crush add-bucket node-4-sata host
      ceph osd crush add-bucket node-5-sata host
      ceph osd crush add-bucket node-4-ssd host
      ceph osd crush add-bucket node-5-ssd host
3、移动host到对应的root下
      ceph osd crush move node-4-sas root=sas
      ceph osd crush move node-5-sas root=sas
      ceph osd crush move node-4-ssd root=ssd
      ceph osd crush move node-5-ssd root=ssd
4、将osd移到host下
      ceph osd crush move osd.3 0.88 host=node-4-sas
      ceph osd crush move osd.4 0.88 host=node-4-sas
      ceph osd crush move osd.6 0.88 host=node-5-sas
      ceph osd crush move osd.7 0.88 host=node-5-sas
      ceph osd crush move osd.1 0.97 host=node-4-ssd
      ceph osd crush move osd.2 0.88 host=node-4-ssd
      ceph osd crush move osd.0 0.97 host=node-5-ssd
      ceph osd crush move osd.5 0.88 host=node-5-ssd
|
导出crush
ceph osd getcrushmap -o crushmap.txt
反编译
crushtool -d crushmap.txt -o crushmap-decompile
打开反编译后的文件
修改rule(修改ruleset、和step take)
1
2
3
4
5
6
7
8
9
10
11
12
13
14
15
16
17
18
| rule ssd {
ruleset 1
type replicated
min_size 1
max_size 10
step take ssd
step chooseleaf firstn 0 type host
step emit
}
rule sas {
ruleset 0
type replicated
min_size 1
max_size 10
step take ssd
step chooseleaf firstn 0 type host
step emit
}
|
重新编译
crushtool -c crushmap-decompile -o crushmap-compiled
应用到集群
ceph osd setcrushmap -i crushmap-compiled
创建一个新的pool
ceph osd pool create ssd 1024
设置ssd pool使用rules 1
ceph osd pool set ssd crush_ruleset 1
校验object的pg的散落方法参考方法2
方法2(直接修改crushmap)
提取现集群中使用的crushmap保存到一个文件
ceph osd getcrushmap -o crushmap.txt
默认导出来的crushmap打开是乱码的,需要进行反编译才能修改
crushtool -d crushmap.txt -o crushmap-decompile
重新编译这个crushmap
crushtool -c crushmap-decompile -o crushmap-compiled
将新的CRUSH map 应用到ceph 集群中
ceph osd setcrushmap -i crushmap-compiled
修改crushmap,需要注意的是bucket ID不要重复了,还有osd的weigh,我这一个osd是90G所以为0.088
1
2
3
4
5
6
7
8
9
10
11
12
13
14
15
16
17
18
19
20
21
22
23
24
25
26
27
28
29
30
31
32
33
34
35
36
37
38
39
40
41
42
43
44
45
46
47
48
49
50
51
52
53
54
55
56
57
58
59
60
61
62
63
64
65
66
67
68
| host node-5-sas {
id -2 # do not change unnecessarily
# weight 0.176
alg straw
hash 0 # rjenkins1
item osd.6 weight 0.088
item osd.7 weight 0.088
}
host node-4-sas {
id -3 # do not change unnecessarily
# weight 0.176
alg straw
hash 0 # rjenkins1
item osd.3 weight 0.088
item osd.4 weight 0.088
}
root sas {
id -1 # do not change unnecessarily
# weight 0.720
alg straw
hash 0 # rjenkins1
item node-5-sas weight 0.360
item node-4-sas weight 0.360
}
host node-5-ssd {
id -6 # do not change unnecessarily
# weight 0.185
alg straw
hash 0 # rjenkins1
item osd.0 weight 0.097
item osd.5 weight 0.088
}
host node-4-ssd {
id -5 # do not change unnecessarily
# weight 0.185
alg straw
hash 0 # rjenkins1
item osd.1 weight 0.097
item osd.2 weight 0.088
}
root ssd {
id -4 # do not change unnecessarily
# weight 0.720
alg straw
hash 0 # rjenkins1
item node-5-ssd weight 0.360
item node-4-ssd weight 0.360
}
# rules
rule ssd {
ruleset 1
type replicated
min_size 1
max_size 10
step take ssd
step chooseleaf firstn 0 type host
step emit
}
rule sas {
ruleset 0
type replicated
min_size 1
max_size 10
step take sas
step chooseleaf firstn 0 type host
step emit
}
|
重新编译这个crushmap
crushtool -c crushmap-decompile -o crushmap-compiled
将新的CRUSH map 应用到ceph 集群中
ceph osd setcrushmap -i crushmap-compiled
创建一个新的pool
ceph osd pool create ssd 1024
设置ssd pool使用rules 1
ceph osd pool set ssd crush_ruleset 1
检查下
ceph osd pool get ssd crush_ruleset
测试在ssd中写入个数据是否都落到osd.0、osd.5、osd.1、osd.2
rbd create ssd/testimg -s 10240 #在ssd pool中创建块
查看pg的散落情况

因为我这是两副本所以只会落到两个osd上,分别落在osd.0和osd.1上。
cinder多后端
修改cinder.conf
1
2
3
4
5
6
7
8
9
10
11
|
enabled_backends=sata,ssd

[ssd]
volume_backend_name=ssd
volume_driver=cinder.volume.drivers.rbd.RBDDriver
rbd_pool=ssd
rbd_user=volumes
rbd_ceph_conf=/etc/ceph/ceph.conf
srbd_secret_uuid=a5d0dd94-57c4-ae55-ffe0-7e3732a24455
rbd_max_clone_depth=5
|
secret_uuid就是对接ceph时导入的secret

创建type
cinder type-create ssd
cinder type-key ssd set volume_backend_name=ssd
重启cinder服务
systemctl restart openstack-cinder-api
systemctl restart openstack-cinder-scheduler
systemctl restart openstack-cinder-volume
通过crushmap隔离故障域,让pg分布在不同机柜上主机上
但这样故域还是host,pg的分布还是比较散乱的,但集群规模大时,如果按照默认的host为故障域的话副本pg很有可能分布同一机架相邻的host的osd上,这样如果你一但此机架断电很有可能导致集群出现ERROR
但我们可以通过修改crushmap 让副本pg分布到不同机架的服务器上去,来达到隔离故障域的目的。

rack 底层的分支
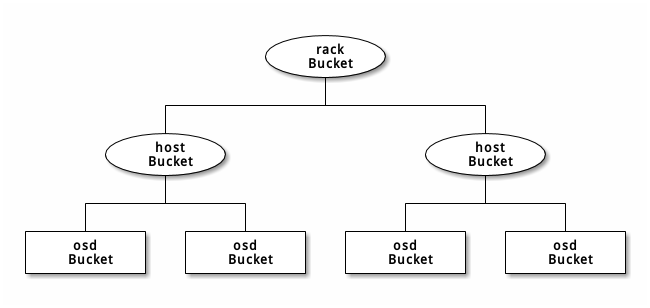
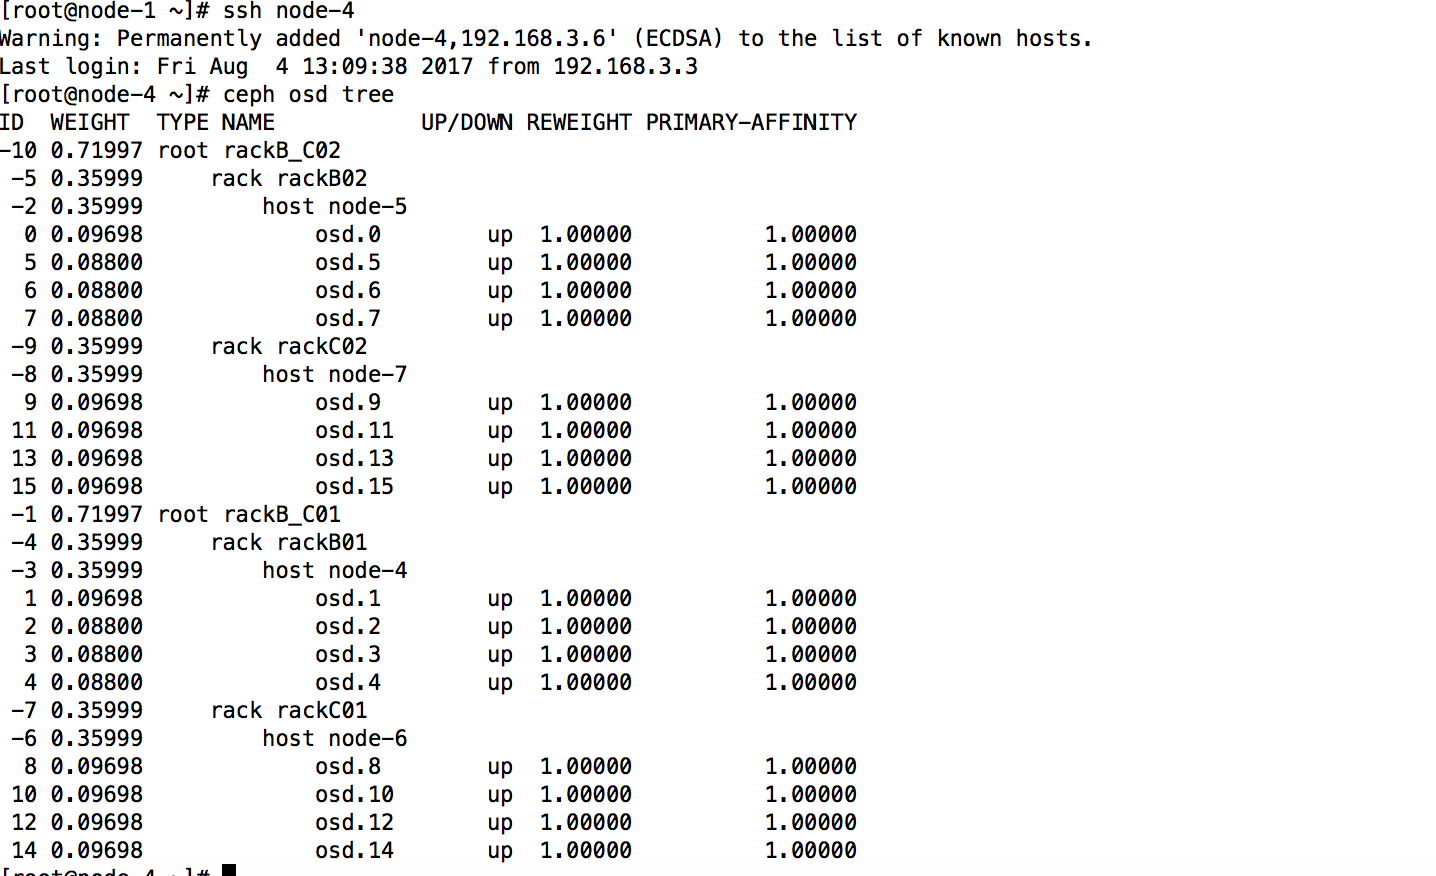
下面方案如下有4个rack,每个rack有一个host ,通过修改crushmap将pg分布到不同列的rack的host上,比如可以指定compute pool的第一个副本放rackB01的node4上,第二个副本放rackC01的node-5上,
1
2
3
4
5
6
7
8
9
| node-5上,
rackB01
node-4
rackC01
node-5
rackB02
node-6
rackC02
node-7
|
这样做的好处就是将副本放在不同列的不同机柜上,来提高可靠性
1
2
3
4
5
| rack方案
node-4 ---B01柜
node-5 ---B02柜
node-6 ---C01柜
node-7 ---C02柜
|
将compute pool的副本都放到B、C 01柜里面讲test_pool的副本都放到B、C 02柜里面
修改后
方法一(直接通过ceph命令):
1
2
3
4
5
6
7
8
9
10
11
12
13
14
15
16
17
18
19
20
21
22
23
24
25
26
| 1、添加racks:
ceph osd crush add-bucket rackB01 rack
ceph osd crush add-bucket rackB02 rack
ceph osd crush add-bucket rackC01 rack
ceph osd crush add-bucket rackC02 rack
3、把每一个host移动到相应的rack下面:
ceph osd crush move node-4 rack=rackB01
ceph osd crush move node-5 rack=rackB02
ceph osd crush move node-6 rack=rackC01
ceph osd crush move node-7 rack=rackC02
4、添加root
ceph osd crush add-bucket rackB_C01 root
ceph osd crush add-bucket rackB_C02 root
4、把所有rack移动到对应 root 下面:
ceph osd crush move rackB01 root=rackB_C01
ceph osd crush move rackB02 root=rackB_C02
ceph osd crush move rackC01 root=rackB_C01
ceph osd crush move rackC02 root=rackB_C02
|
导出crushmap 添加rules
ceph osd getcrushmap -o crushmap.txt
反编译
crushtool -d crushmap.txt -o crushmap-decompile
修改
添加如下(注意ruleset、和step take)
1
2
3
4
5
6
7
8
9
10
11
12
13
14
15
16
17
18
| rule rackB_C01 {
ruleset 0
type replicated
min_size 1
max_size 10
step take rackB_C01
step chooseleaf firstn 0 type rack
step emit
}
rule rackB_C02 {
ruleset 1
type replicated
min_size 1
max_size 10
step take rackB_C02
step chooseleaf firstn 0 type rack
step emit
}
|
编译
crushtool -c crushmap-decompile -o crushmap-compiled
将新的CRUSH map 应用到ceph 集群中
ceph osd setcrushmap -i crushmap-compiled
设置test_pool套用rule rackB_C02
ceph osd pool set test_pool crush_ruleset 1
查看是否应用成功

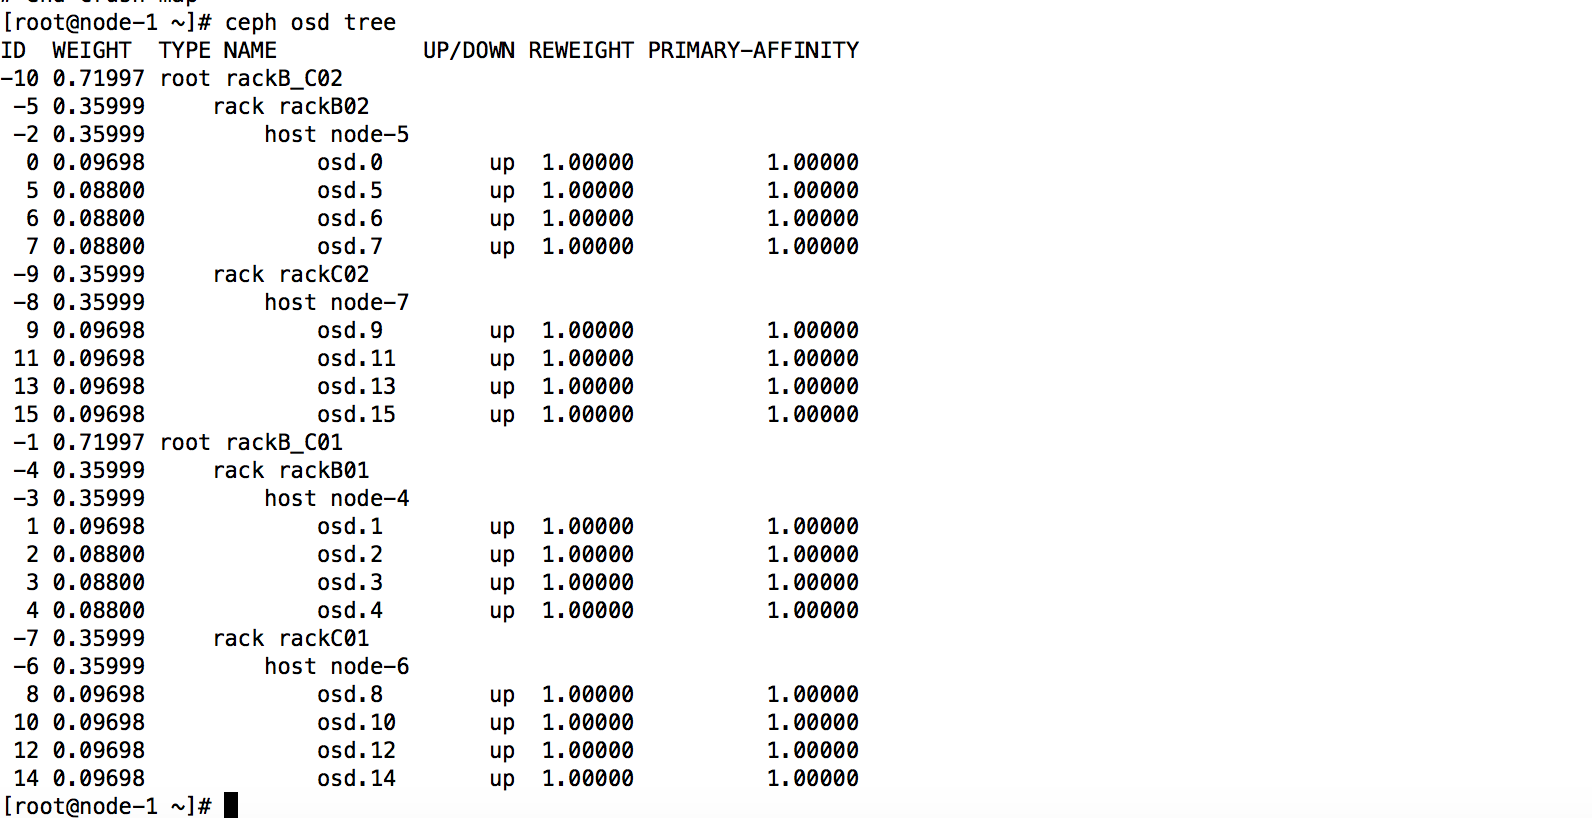
测试
在test_pool里面创建个对象应该分到B02和C02柜的host上面的osd上,
rbd create test_pool/testimg -s 1024
在test_pool里面创建个对象应该分到B01和C01柜的host上面的osd上,
rbd create compute/test_2.img -s 1024
查看


这样副本pg就会分布在不同机柜的不同host上的osd。


